# Interface Guide
## Entering the Cover Page
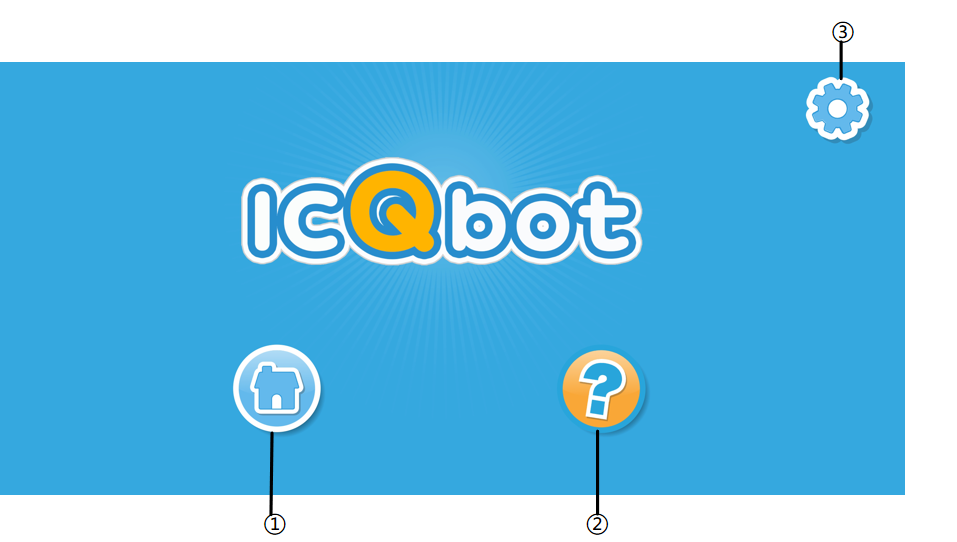
| No. | Name | Description |
| :---: | :---: | --- |
| ① | Home | Click here to enter the project creation and selection page. |
| ② | Help | Click here to play a tutorial video. After closing the video, it will return to the home interface. |
| ③ | Settings | Click here to select the language (Chinese, English, Russian). |
## Home Interface
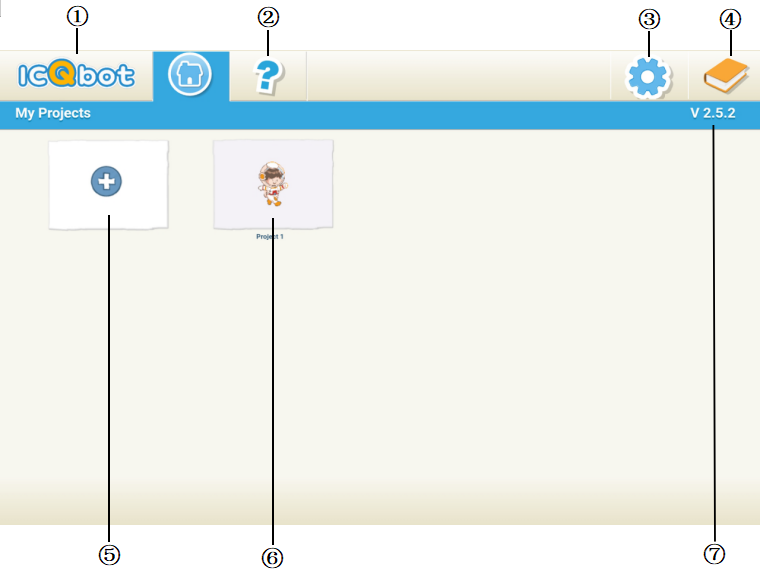
| No. | Name | Description |
| :---: | :---: | --- |
| ① | Return to cover page | Click the logo to return to the cover page. |
| ② | Help | Click here to enter the help page. |
| ③ | Settings | Click here to select the language (Chinese, English, Russian). |
| ④ | Usage Instruction | Click here to access 'About KIDZQbot,' 'Interface Guide,' 'Drawing Editor Guide,' and 'Block Guide.' |
| ⑤ | New Project | Click here to create a new blank project. |
| ⑥ | Enter Project | Click here to enter a saved project. |
| ⑦ | Version | Displays the version number of the programming software. |
## Programming Interface
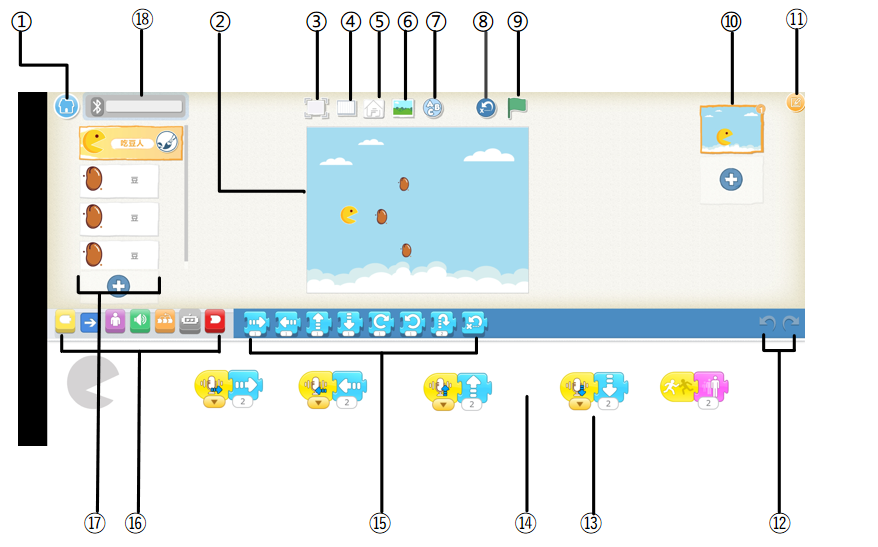
| No. | Name | Description |
| :---: | :---: | --- |
| ① | Save | Save the current project and return to the homepage. |
| ② | Stage | The stage where project characters perform. To delete a character on the stage, press and hold the character, then click the delete icon that appears. |
| ③ | Full Screen | Expand the stage to full screen. |
| ④ | Grid Mode | Click to display or hide the current grid. |
| ⑤ | Control Panel | View information about the currently connected device and the firmware version number. |
| ⑥ | Change Background | Select or draw an image to use as the stage background. |
| ⑦ | Add Text | Input text content on the stage. |
| ⑧ | Reset Characters | Reset all characters to their original positions on the stage (you can drag the character to set the original position). |
| ⑨ | Green Flag | Start all programs that begin with the block “When the green flag is clicked.â€? |
| ⑩ | Page | Select a page within the project or click the plus icon to add a new page. |
| ⑪ | Project Info | Change the project name, view the project creation date, or share the project. |
| ⑫ | Undo & Redo | Click "Undo" to go back to the previous step. Click "Redo" to redo the last undone operation. |
| ⑬ | Program Blocks | Represented in graphical, block form, users can drag and combine blocks to create programs. Click a block to execute the program. To delete a block, drag it outside the workspace. To copy a program from one character to another, drag and drop it onto another character's thumbnail. |
| ⑭ | Programming Workspace | A centralized, structured workspace for writing, editing, debugging, and managing programs. |
| ⑮ | Block Panel | Displays available blocks. Click to view the functionality of the modules. |
| ⑯ | Block Categories | Categories program blocks by function: Trigger (yellow), Action (blue), Appearance (purple), Sound (green), Control (orange), End (red). |
| ⑰ | Character | Select a character. Click the plus icon to add a new character. When a character is selected, you can write their program. Click the name to rename the character. Click the brush icon to edit the character’s image. To delete a character, press and hold it, and the delete icon will appear. To copy a character to another page, simply drag it to the thumbnail of the other page. |
| ⑱ | Bluetooth | Click to open the Bluetooth connection window and select the device to connect. |
## Drawing Editing Interface
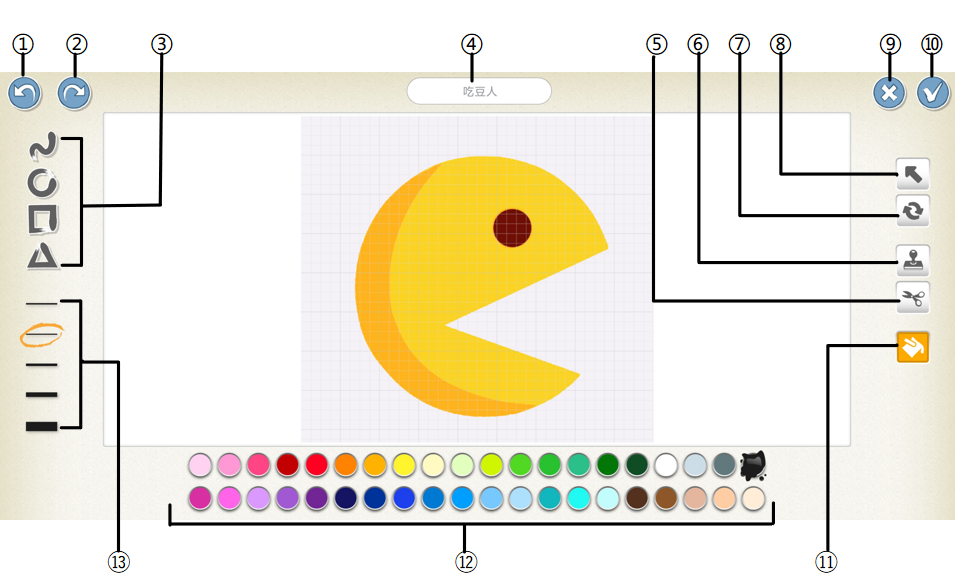
| No. | Name | Description |
| :---: | :---: | --- |
| ① | Undo | Use this tool to undo the last action. |
| ② | Redo | Use this tool to redo the last undone action. |
| ③ | Shapes | Select the shape to draw: line, circle, square, or triangle. |
| ④ | Character Name | Displays the character's name. Click to edit it. |
| ⑤ | Cut | Use this tool to cut a specific shape. After clicking the cut tool, click the character or shape to remove it from the canvas. |
| ⑥ | Copy | Use this tool to copy a specific shape. After clicking the copy tool, click the character or shape to copy and paste it on the canvas. |
| ⑦ | Rotate | After clicking the rotate tool, you can rotate the character or shape on the canvas. |
| ⑧ | Drag | After clicking the drag tool, you can drag the character or shape to the desired location on the canvas. If you select a shape, you can also drag the small dots to modify the shape. |
| ⑨ | Cancel | Cancel drawing edits. |
| ⑩ | Save | Save changes and exit the drawing editor. |
| ⑪ | Fill | Use the fill tool to color a specific area of a character or shape. |
| ⑫ | Color | Select the color for drawing lines or filling shapes. |
| ⑬ | Line Thickness | Change the thickness of the lines when drawing. |
## Help Page
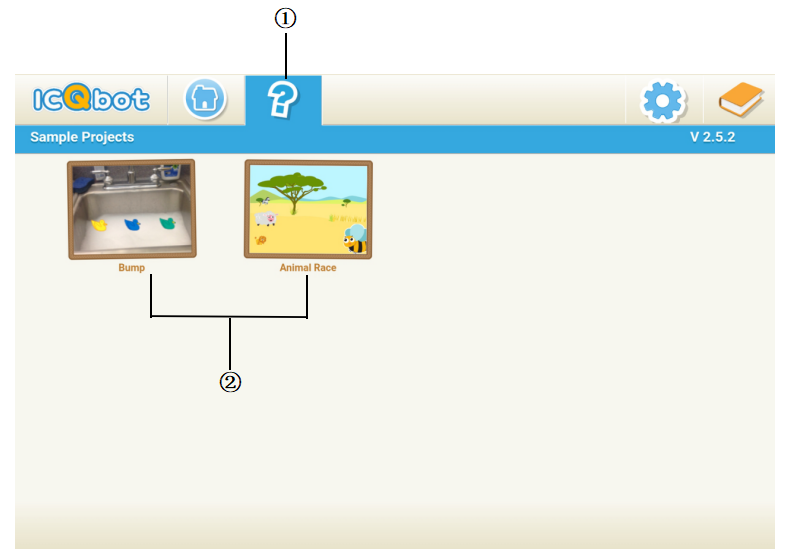
| No. | Name | Description |
| :---: | :---: | :---: |
| ① | Introduction Video | Here you can watch a beginner tutorial video. |
| ② | Project Examples | Learn how to use these two projects to quickly get started. |
## Bluetooth Connection Interface
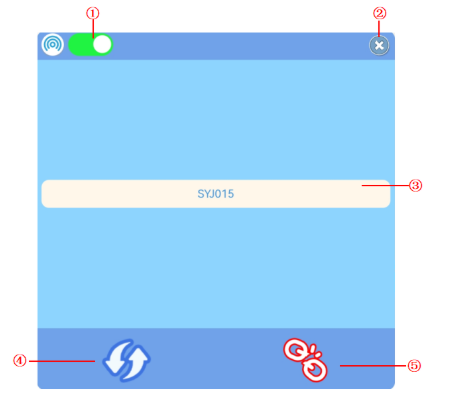
| No. | Name | Description |
| :---: | :---: | --- |
| ① | Switch |
Used to switch between automatic Bluetooth connection and manual Bluetooth connection modes.
When the switch is gray, manual Bluetooth connection mode is enabled. Users need to manually select the Bluetooth device name to connect.
When the switch is green, automatic Bluetooth connection mode is enabled. Bring the powered-on controller close to the mobile device to establish a Bluetooth connection automatically. |
| ② | Close | Used to close the Bluetooth connection interface. |
| ③ | List | Displays the names of discovered Bluetooth devices. |
| ④ | Refresh | Used to refresh the information displayed in the list. |
| ⑤ | Disconnect | Used to disconnect the currently connected Bluetooth device. |
## Console Interface
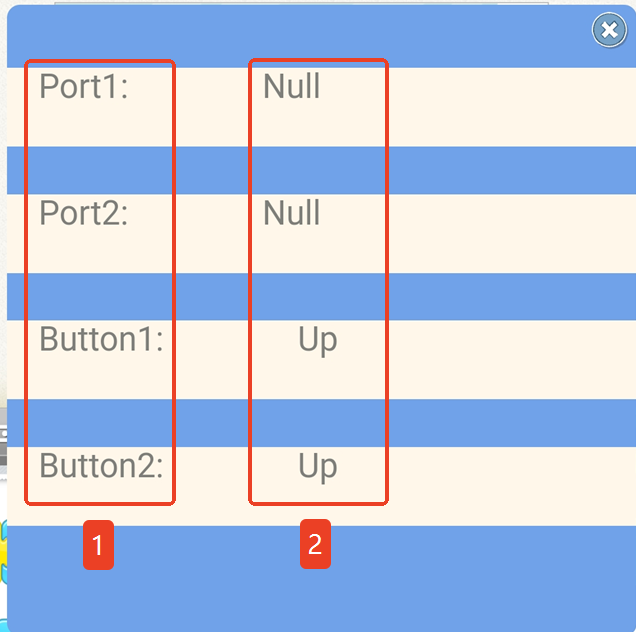
| No. | Name | Description |
| :---: | --- | --- |
| ① | Name | Corresponds from top to bottom to Blue Port 1, Blue Port 2, Button 1, and Button 2 on the KIDZQbot Controller. |
| ② | Status | **Indicates the real-time status of the ports and buttons.**
**Port 1 and Port 2:** Displays the name of the connected module and its current status.
**Button 1 and Button 2:** Displays the button status (**Pressed / Released**). |